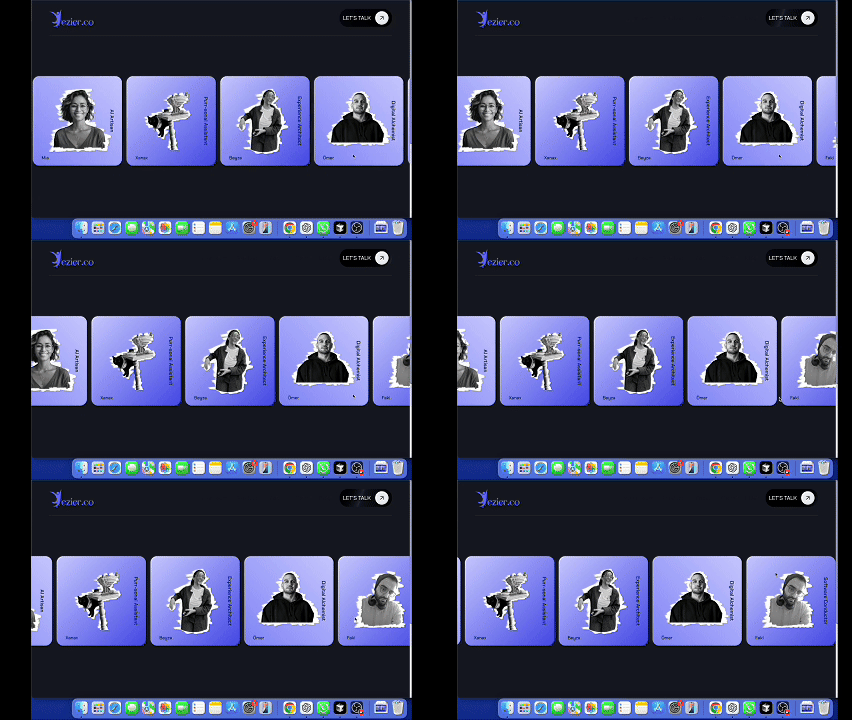
You've probably seen this animation on a website, right?

It’s a timeless design, like a good pair of jeans. Maybe you've added a new coupon code to your e-commerce shop, have an announcement about your product, or want to showcase your “partners in crime” in the testimonials section. Perhaps you’re featuring your team, as we did on the About section at ezier.co.
This animation is incredibly versatile for these purposes, as our brains are already familiar with its movement and flow.
However, as the original “news ticker” look quickly became outdated, it has evolved, and people are now using it in creative ways. Check these out:


So how do we build a reusable and highly-customizable Marquee component that can be used across projects and adapted to fresh ideas? We’ll create one from scratch and dive into some related topics along the way. Let’s go!
Possible Directions to Choose
There are numerous ways to implement a Marquee element. Did you know there used to be an actual HTML <marquee> element? It was as simple as
1<marquee>Your text here</marquee>and it would just scroll. However, it had limitations and was eventually deprecated, so we can’t use it anymore.
If you’re familiar with JavaScript animation libraries like Framer Motion or GSAP, you could create a Marquee component using those. But we’re aiming for a minimal yet powerful solution, so we’ll stick to CSS keyframes and JavaScript. We’ll make this a React component using TailwindCSS, but it can be easily adapted to any other framework, or even vanilla JS and plain CSS.
Understanding the Customization Options
When we look at the animation, what customization options come to mind? Here are a few we’ll implement (and we can add more as needed):
- className: To add additional classes to the container element.
- speed: To control the animation speed.
- direction: To set the animation’s direction.
Step by Step Implementation
Enough talking. Let's write some code.
1. Barebones with just children prop
1"use client";
2import { cn } from "@/lib/utils";
3import React from "react";
4
5const Marquee = ({ children }: { children: React.ReactNode }) => {
6  return (
7    <div className="overflow-clip">
8      <div className="flex w-max animate-marquee-move gap-4 pl-4">
9        {children}
10        {children}
11      </div>
12    </div>
13  );
14};
15
16export default Marquee;
And inside our tailwind.config.ts file let's add the keyframes and animation under theme.extend
1keyframes: {
2  "marquee-move-text": {
3    from: {
4      transform: "translateX(0)",
5    },
6    to: {
7      transform: "translateX(-50%)",
8    },
9  },
10},
11animation: {
12  "marquee-move": "marquee-move-text 30s linear infinite forwards",
13},
2. Add the initial props for customization
1"use client";
2import { cn } from "@/lib/utils";
3import React, { ComponentPropsWithoutRef, CSSProperties } from "react";
4
5interface MarqueeProps extends ComponentPropsWithoutRef<"div"> {
6  direction?: "left" | "right";
7  speed?: "slow" | "normal" | "fast";
8}
9
10const Marquee = ({
11  className,
12  speed = "normal",
13  direction = "left",
14  children,
15  ...props
16}: MarqueeProps) => {
17  const speedVar = speed === "slow" ? "40s" : speed === "normal" ? "30s" : "10s";
18  const directionVar = direction === "left" ? "forwards" : "reverse";
19
20  return (
21    <div
22      className={cn("overflow-clip", className)}
23      style={
24        {
25          "--speed": speedVar,
26          "--direction": directionVar,
27        } as CSSProperties
28      }
29      {...props}
30    >
31      <div className="flex w-max animate-marquee-move gap-4 pl-4">
32        {children}
33        {children}
34      </div>
35    </div>
36  );
37};
38
39export default Marquee;
Now our component can accept all the props of a regular div element, plus the direction and speed options. Let’s also update our animation in tailwind.config.ts.
1animation: {
2  "marquee-move": "marquee-move-text var(--speed, 30s) linear infinite var(--direction, forwards)",
3},
3. Add animation-play-state and Some Mask Magic
1interface MarqueeProps extends ComponentPropsWithoutRef<"div"> {
2  direction?: "left" | "right";
3  speed?: "slow" | "normal" | "fast";
4  pauseOnHover?: boolean;
5  maskEdges?: boolean;
6}
7
8const Marquee = ({
9  className,
10  speed = "normal",
11  direction = "left",
12  pauseOnHover = false,
13  maskEdges = false,
14  children,
15  ...props
16}: MarqueeProps) => {
17  const speedVar = speed === "slow" ? "40s" : speed === "normal" ? "30s" : "10s";
18  const directionVar = direction === "left" ? "forwards" : "reverse";
19
20  return (
21    <div
22      className={cn("overflow-clip", className, {
23        "hover:[&>div]:[animation-play-state:paused]": pauseOnHover,
24        "mask-edges-sm": maskEdges,
25      })}
26      style={
27        {
28          "--speed": speedVar,
29          "--direction": directionVar,
30        } as CSSProperties
31      }
32      {...props}
33    >
34      <div className="flex w-max animate-marquee-move gap-4 pl-4">
35        {children}
36        {children}
37      </div>
38    </div>
39  );
40};
You might be wondering where the mask-edges-sm class comes from. It’s a custom class we created:
1.mask-edges-sm {
2    mask: linear-gradient(90deg, transparent, white 2%, white 98%, transparent);
3    -webkit-mask: linear-gradient(
4      90deg,
5      transparent,
6      white 1%,
7      white 99%,
8      transparent
9    );
10}
4. Adding a ref Object for Additional Control
1const Marquee = forwardRef<ElementRef<"div">, MarqueeProps>(
2  (
3    {
4      className,
5      speed = "normal",
6      direction = "left",
7      pauseOnHover = false,
8      maskEdges = false,
9      children,
10      ...props
11    },
12    ref,
13  ) => {
14    const speedVar = speed === "slow" ? "40s" : speed === "normal" ? "30s" : "10s";
15    const directionVar = direction === "left" ? "forwards" : "reverse";
16
17    return (
18      <div
19        ref={ref}
20        className={cn("overflow-clip", className, {
21          "hover:[&>div]:[animation-play-state:paused]": pauseOnHover,
22          "mask-edges-sm": maskEdges,
23        })}
24        style={
25          {
26            "--speed": speedVar,
27            "--direction": directionVar,
28          } as CSSProperties
29        }
30        {...props}
31      >
32        <div className="flex w-max animate-marquee-move gap-4 pl-4">
33          {children}
34          {children}
35        </div>
36      </div>
37    );
38  },
39);
40
41Marquee.displayName = "Marquee";
Great! Now, if we ever need to pass a ref object for extra control, it’s already set up and ready to go.
5. Fixing Screen Reader Issues
We added a second children prop to make the animation loop smoothly, but this raises an accessibility issue. We need to make the second children element invisible to screen readers while keeping it visible to users. How can we do that?
Well, I bet you thought:
Lemme wrap that second one with another div and we good.
Nope. Unfortunately, we can’t do that without breaking the layout.
Instead, we can add an aria-hidden attribute to the elements in the second children instance. There’s a great little helper in React to do this:
1<div className="flex w-max animate-marquee-move gap-4 pl-4">
2  {children}
3  {React.Children.map(children, (child) =>
4    React.cloneElement(child as React.ReactElement, {
5      "aria-hidden": "true",
6    }),
7  )}
8</div>
6. Putting it All Together
1"use client";
2import { cn } from "@/lib/utils";
3import React, {
4  ComponentPropsWithoutRef,
5  CSSProperties,
6  ElementRef,
7  forwardRef,
8} from "react";
9
10interface MarqueeProps extends ComponentPropsWithoutRef<"div"> {
11  direction?: "left" | "right";
12  speed?: "slow" | "normal" | "fast";
13  gap?: "sm" | "md" | "lg";
14  pauseOnHover?: boolean;
15  maskEdges?: boolean;
16}
17
18const Marquee = forwardRef<ElementRef<"div">, MarqueeProps>(
19  (
20    {
21      className,
22      speed = "normal",
23      direction = "left",
24      gap = "md",
25      pauseOnHover = false,
26      maskEdges = false,
27      children,
28      ...props
29    },
30    ref,
31  ) => {
32    const speedVar =
33      speed === "slow" ? "40s" : speed === "normal" ? "30s" : "10s";
34    const directionVar = direction === "left" ? "forwards" : "reverse";
35    return (
36      <div
37        ref={ref}
38        className={cn("overflow-clip", className, {
39          "hover:[&>div]:[animation-play-state:paused]": pauseOnHover,
40          "mask-edges-sm": maskEdges,
41        })}
42        style={
43          {
44            "--speed": speedVar,
45            "--direction": directionVar,
46          } as CSSProperties
47        }
48        {...props}
49      >
50        <div
51          className={cn("flex w-max animate-marquee-move", {
52            "gap-2 pl-2": gap === "sm",
53            "gap-4 pl-4": gap === "md",
54            "gap-6 pl-6": gap === "lg",
55          })}
56        >
57          {children}
58          {React.Children.map(children, (child) =>
59            React.cloneElement(child as React.ReactElement, {
60              "aria-hidden": "true",
61            }),
62          )}
63        </div>
64      </div>
65    );
66  },
67);
68
69Marquee.displayName = "Marquee";
70
71export default Marquee;
72
🔥 Yess, we did it!
Conclusion
Now you know how to create a performant, highly-customizable Marquee component. Use it to add awesome marquee animations across your projects.
Thank you for reading, and see you in the next one!
